There are so many ways to be creative in photography- including when it comes to framing. If you’re like me, you enjoy having creative projects, and you know that framing can be expensive. Therefore, in this [two part] tutorial, I will first be giving instruction on how to antique a flea market frame. In a later post, I will follow this with a tutorial on how to easily back an older frame. So let’s get started!
WHAT YOU’LL NEED
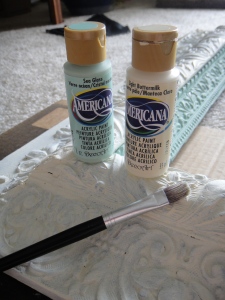
1. Two-Three paint colors of your choice. (This particular frame works well with 3 colors because of its layered look. Most other frames will only need 2 colors, the base and antiquing color. Not pictured is the antiquing color: Martha Stewart, Black nickel in metallic.)
2. Medium size paint brush
3. Light-Medium weight sanding block
4. Paper towels & Newspaper\cardboard

(Colors: Sea Glass & Lt. Buttermilk)
PREP WORK
As previously mentioned in Trash or Treasure?: Flea Markets & Up-cycling, its important to make sure the frame you choose can handle any work you will be doing to it. (Unless you’re prepared to fix it!) The frame should be structurally sound to take stapling for re-backing, and strong enough to hold for wall hanging. (No rotting wood, nails falling out, or old glue likely to come apart.)
In addition, the wood\texture should be strong enough to with stand some light sanding. Occasionally, older frames have soft wood, which is fine. In fact, it can often add character to your project. However, avoid overly soft wood that crumbles to the touch or brush. Here is the frame I have chosen:
Now that you’ve found the right frame, it’s time to prepare it for paint. As I mentioned, older frames are fragile overall because of just that- they’re old! Therefore, you will want to use a fine to medium weight sand paper. All you’re really trying to do is mildly “rough up” the surface so the paint can grab hold. Do NOT use powered sanders. Most sanders are so powerful they will sand any designs right off or ruin the older frame!
After you’ve finished sanding, using a wet paper towel wipe down all surfaces of the frame. This will allow your paint to apply and stick easier by removing dirt from sanding and being in storage.

PAINTING
First apply the base coats. Since this frame is actually consistent of two frames layered, I chose to paint the inner frame with the Sea Glass and the outer frame with the Buttermilk (ivory) color. Be sure to use two coats to eliminate streaking and inconsistent color.

ANTIQUING
Next, using the black metallic color, we will do the antiquing. The easiest way to get an antiqued look is to use a “dry brushing” technique. That means using minimal paint (or a basically dry brush) and a light hand movement over the surface. This technique tends to be easier on textured surfaces, but it can be done on either textured or flat. Here is what both may look like:

FINISHED PRODUCT
TA DA! Here is it looks like after everything’s done!
Good luck and please ask any questions you may have! This is a two part tutorial, so get started on your frame painting project and be ready for the follow up of how to back an old frame. Remember to find me on Facebook and follow me here on WordPress. Until next time!
Noel


